Have you ever felt the painful burning sensation in your eyes when you have to work for longer hours on your computer screen or your cell phone? I do, and luckily, I have found a solution for it. F.lux is a neat free tool built for Mac, Windows, iOS and Android. It controls the brightness of the screen depending on the time of the day. The display is bright in the morning and dims down at night, putting much less strain on the eyes.
The bright light emitted from cell phones or laptop screens may also interfere with sleep patterns, causing difficulty in falling asleep. F.lux helps with that as well.
Download free F.lux today and enjoy seeing better and sleeping better.
Imagine this! Your client is struggling with installing drivers for printer on his/her computer and need your help. You are trying your best to help through phone but your client can’t seem to follow your instructions.
So frustrating! Isn’t it?
You feel like going to your client’s office immediately and get the problem fixed. The only problem is, your client is roughly a 4000 miles away.
What if I tell you that you can, in fact, access your client’s computer from 4000 miles away and get the problem fixed !?! That’d be great, right?
Now, what if I tell you that you don’t have to spend a dime out of pocket to access that computer from 4000 miles away !?! Yes! Won’t that be amazing!
TeamViewer is an amazing tool , free for personal and non-commercial use, that you can get to access and work on a remote computer. Its functionality goes far beyond the remote support example I quoted above. Using TeamViewer, you can easily access your office computer from anywhere and work remotely (or vice versa), participate in online meetings and presentations, chat with other people or groups, make video calls, and share files.
I often use TeamViewer in my one-on-one live training sessions, so that my students can watch and learn how certain operation are performed.
Compatible to work on Windows, Mac, Linux, Chrome OS, Android, iOS and Blackberry, TeamViewer is, hands down, a complete solution for remote access and online collaboration.
In today’s age and time, there are a lot of people who use fax messages (yes, still!).
Fax Zero is an excellent resource that you can use if you do not wish to spend $$ on a fax machine that you are not likely to use every now and then, or, you do not have a physical phone line that you can use for sending your fax message through your computer. The document to be faxed must be a Word document or a PDF.
You can send up to 5 free fax messages per day to US and Canada. Each fax message may have up to 3 pages. That means 15 pages in a day, for free! Not bad at all! The only (little) catch in this free offer is that, the cover page will have Fax Zero’s branding (Cover page is not included in the 3 pages).
If the recipient is outside US and Canada, Fax Zero charges a very reasonable fee per fax starting from only $1.99 per fax, depending on the location. The cover page will be ad-free.
Give it a try and share your experience in the comments below! Here is the link:
How to Send out Personalized Emails to a List From Your Google, Yahoo or Hotmail account
I must admit that there are a million ways to personalize and send out emails to a list, but most of these methods either require expensive softwares or are difficult to set up and use. If you are a Windows user and have MS Outlook or Outlook Express installed on your computer, you may mail merge and send out emails to multiple addresses at once, but again you must know how to mail merge. I am going to do a post on mail merge soon but for now, let’s keep our focus on sending out an email blast to a list.
As you may know by now how much I love free stuff, I am going to show you a super simple way to send out personalized emails to a list of up to 50 email addresses from your Google, Yahoo or Hotmail email account for free. In fact, you may send out these personalized emails from any email account as long as you know the SMTP/IMAP/POP settings of your email server. In addition to the emails, you may use this software to send out your newsletters or auto-responder marketing emails. I have used it only for sending out emails to a list but if you want, you can set it up to receive incoming email as well (e.g. subscribe/remove requests etc.)
MailList Controller is an easy to use software designed for Windows and can be easily downloaded and installed. The free version has one limitation that makes it different from the paid version. You can only have 1 list of upto 50 email addresses. But you can always remove a list and upload a new one once you are done sending out emails to that list. That’s what I do when I have to send out emails to a longer list. I split up the list and then upload these shorter lists one at a time. Once I finish sending emails to one list, I remove it and upload the next. Since I use it only for sending emails, this trick works well for me. I set it up to receive any incoming emails/replies/subscription requests to my Gmail inbox. You can always buy a one-time license for MailList Controller that would enable you to use larger and multiple lists and run multiple email campaigns. Here is the link if you are interested in the paid version: https://www.arclab.com/en/amlc/purchase.html
How Does MailList Controller Works (A very quick walk through)
When you run the software for the first time after installation, you are asked to run “Express Setup” or “Custom Setup”. When I installed this software, I chose the “Express Setup” option which was fast and quick. If for any reason, you would like to run the custom setup, a step-by-step detailed user manual that comes with the software will walk you through the entire process.
Ideally, choose Express setup
After the software is installed, uploading the list of recipients is the next step. Ideally, the list should be uploaded before you compose an email or a newsletter so that you could add custom fields from the list in the composed message for personalization (First Name, Last Name, Address etc.) MailList Controller supports lists in MS Excel, MS Access, MS SQL, MySQL, ODBC, Text, formats.
You will be asked to provide a name and description of the list (You may skip the description).
Setting up MailList Controller
On the next screen, the program will ask you to provide the email address from which you want to send out the emails and, a friendly name that you want to use as the Sender’s name. This name will be displayed as the Sender’s name in recipients’ email account. If you check the box to auto-detect mail server settings for incoming and outgoing emails, it will automatically get the SMTP/IMAP/POP server settings for your email account. I use Gmail and when I checked this option while installation, MailList Controller auto-detected all the settings for my Gmail account. It was quick and there were no glitches.
Setting up MailList Controller
If you use other email servers, auto-detect feature might not work properly and you may have to set it up manually. For that, you will need the SMTP/IMAP/POP server for your email account. Although the software supports POP and IMAP servers, using an IMAP account is recommended. Detailed step-by-step instructions for setting up email server manually are provided in the user manual that comes with the software.
On the next screen, you will also be asked to provide username and password for your email account.
Setting up MailList Controller
Once you’ll reach the screen where you will be asked to upload the list, you will see 2 options: Mailing List and Linked List. I always select linked list and always prepare my lists in MS Excel. No specific reason for these choices…. I just feel comfortable using these options!!! The next few screens will ask you to specify worksheet in the Excel Workbook that contains the data, point out the column containing email addresses and custom fields that you need for personalization.
This may seem like a long process as you read it, but when you are actually doing it, it takes less than 10 minutes to set up the list and email server settings.
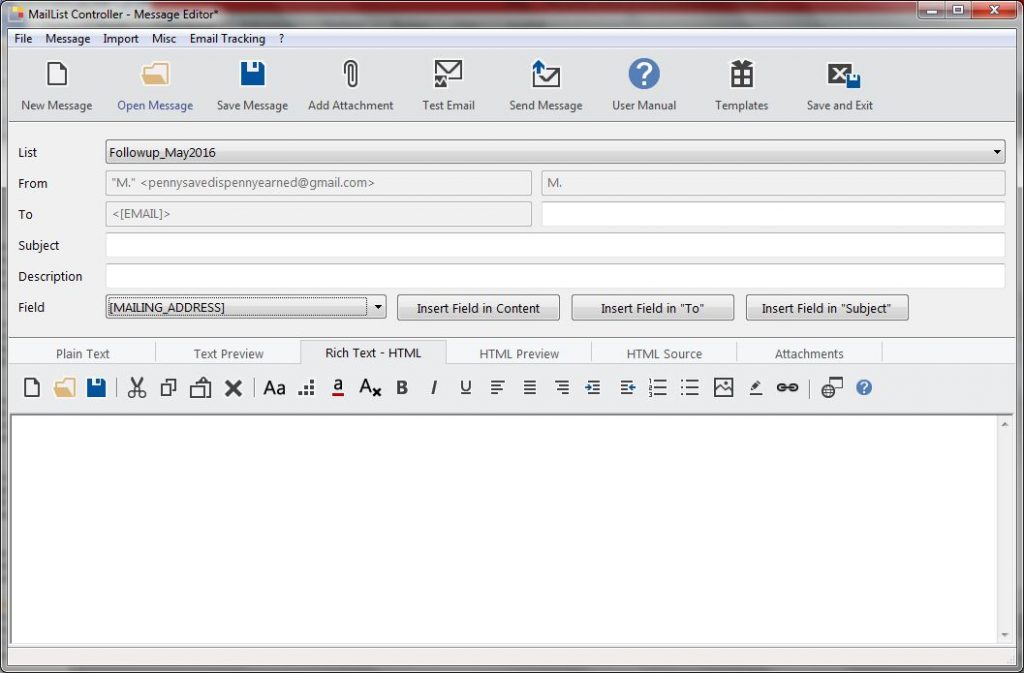
After the list is uploaded, you may compose a message in plain text, rich text format or both. I recommend composing your message in both plain text and rich text formats so that if your recipient do not use html emails, they may still be able to read your message in text format.
With MailList Controller, you may compose an email message in RTF or TXT formats
Once you compose the message, you may send it out to the list instantly or schedule it to be sent at a later time.
My Verdict:
MailList Controller is a great free tool that is easy to use and is packed with great features for creating and tracking email campaigns or email blasts. Although free version only allows uploading one list of not more than 50 email addresses, I don’t mind doing a little extra work of splitting up longer lists and uploading one list at a time. As long as I am saving some bucks and my work is being done, a little extra work goes a long way. I highly recommend using MailList Controller. Do give it a try and let me know of your experience.
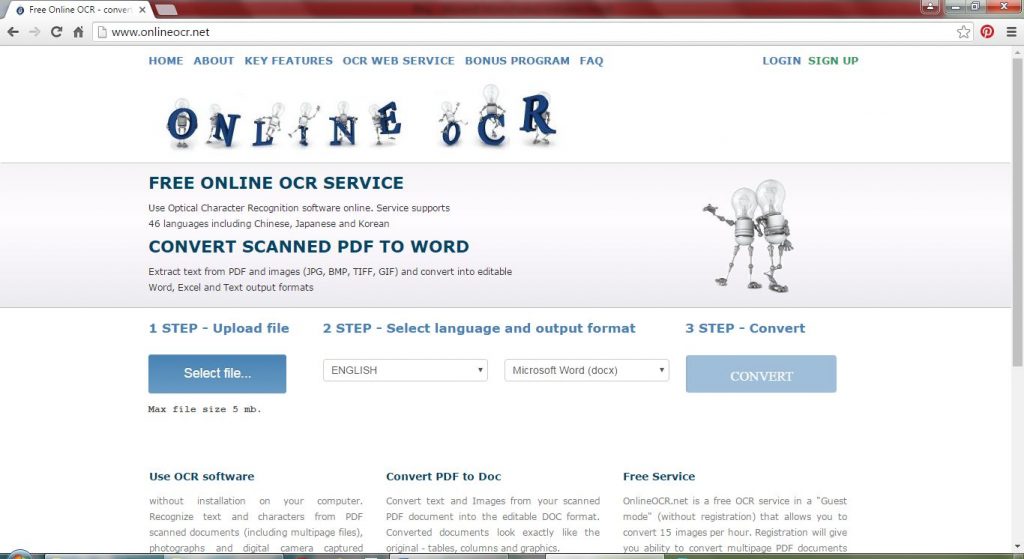
How to extract text from PDF, JPG, BMP, TIFF, GIF and convert into editable Word, Excel and Text format
Sometime back, while I was working for one of my clients, she sent me an email with an attachment. It was a printed letter that she had received in regular mail, and she had scanned it as JPG. She asked me to reproduce an exact copy of that letter so that she could edit it.
It was a long letter, and I was already in the middle of working on a project with a close deadline. So I went to see my old friend “Google” and asked for help. Google did not disappoint me… it never does!
While googling for a free resource that could help me convert that scanned image into an editable document, I came across this amazing website that converts PDF, JPG, BMP, TIFF, GIF and convert into editable formats for FREE!
Since it was only a single page, all I had to do was upload the JPG, select the language, select the output format and click on the convert button. That’s it. In less than 20 seconds, the converted document was downloaded to my computer. Other than 2 wrong spellings (the words were a bit blurry due to paper fold marks) it was perfect! Did I mention that my eyes were all watery with tears of joy!!!
OnlineOCR is a free service. It supports 46 recognition languages. You do not have to download or install anything. All you need is an internet connection and your computer. It works beautifully on mobile devices as well. You do not have to register or share your email address. Converted documents look exactly like the original with all the tables, columns and graphics etc. As a guest visitor, OnlineOCR allows you to convert 15 images per hour and the size of the uploaded file cannot be more than 5 MB. If you decide to register (registration is free), you may convert multipage PDF documents. As a registered user, you may convert upto 25 pages and the size of the uploaded file can be up to 100 MB. If you need to convert more than 25 pages, you may purchase additional pages from OnlineOCR.net. Also, as a registered user, You can upload more than one file at once by placing the files in a ZIP archive.
Registered users may also convert only selected pages from the uploaded file. For example, if you want to convert only the first 2 pages from a 10 page PDF document, you can specify that before converting so that you only get first 2 pages converted into editable format.
I am a huge fan of OnlineOCR.net and have been using it for quite some time now. If you are looking for a fast and accurate (well almost accurate) solution for converting scanned documents into editable formats, do try OnlineOCR.net, and thank me later 😉
I am one of those people who take utmost pleasure in crossing off items on a to-do list. It gives a great sense of achievement!
When I was working as a real estate transaction coordinator, I had to bring this whole “crossing off fun” to the next level. There were strict timelines to follow and a LOT of coordination was required among all parties involved.
I desperately started looking for a digital planner/calendar that I could place on my laptop desktop so that it would stay in front of my eyes at all times. Of course, I did consider using Gmail Tasks and Calendar but my email Inbox was already such a mess :p I did not want extra emails coming my way every day.
After spending some time googling for the right tool, I finally found “Interactive Calendar”. It was a match made in heaven as it does everything I was looking for! And, it was FREE to download!!!!!
The calendar sits neatly on the desktop and appears as a transparent overlay, merging perfectly with the background. The various options in the calendar lets you choose size of the calendar, font styles, cell styles etc. Here is how my calendar looks like:
Free Interactive Calendar
You can add a task/reminder to the calendar by double-clicking on the date cell. A new window pops up where a task can be added. A detailed description, complete with links and images can also be added with each task.
Once a task is complete, you can cross it off by double-clicking on the date cell in the calendar and marking the task as complete. My favourite part 😉
This interactive calendar also lets you print and export the tasks into formats compatible with MS Excel and notepad. This comes handy when you have to prepare a progress report of what you could accomplish in a day’s work. The calendar lets you print the completed tasks or you may email that list to your client or boss.
One of the best things about this calendar is that, it is one of the first things that I see as soon as I start working. It is right there on my desktop, letting me know what needs to be done on a day.
On the fun side, you can set up your calendar to change your desktop background automatically at a time you set with pictures you choose! Isn’t that cool!!!
If you are interested, you can download your free calendar from the lick below:
Bullzip PDF Printer is a nifty free tool that I have been using for quite some time now. It is a virtual printer that can be easily downloaded and installed and works like any other printer with just one difference. It doesn’t print on paper. Instead, it creates files in the following formats: PDF, JPEG, BMP, TIFF, PNG, EPS, PCX.
Free Bullzip Printer works just like a regular printer
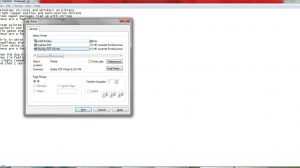
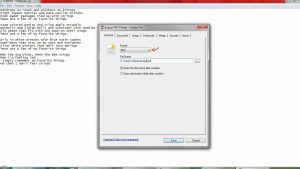
The Bullzip PDF printer asks you to select the format of the file just before printing.
Free Bullzip Printer can convert to PDF JPEG BMP TIFF PNG EPS PCX Formats
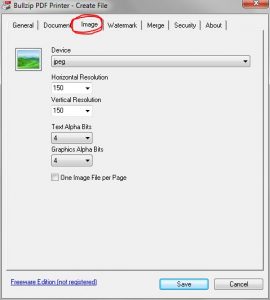
When creating a JPEG from Bullzip Printer, you can set the resolution of the image.
Set Image Resolution when creating JPEG
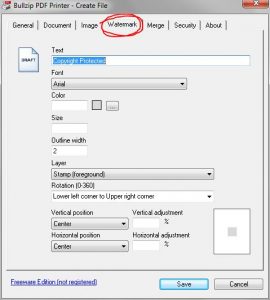
Unlike many other free format conversion softwares, there are no ugly watermarks or stamps of any sort. The converted documents are absolutely clean and of good quality (no pixilated, blurry text or image). However, if you want to add a watermark or a stamp, you can do that too!
Add Watermark
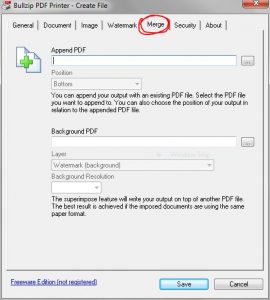
Bullzip PDF Printer not only converts but it also enables you to combine/merge multiple pdf files into a single PDF document. Isn’t it cool?
Combine Multiple PDF Documents into a Single File
This neat little software takes very less space and enables one to create PDFs and images in multiple formats without having to purchase expensive softwares. Look no further if you want to Convert MS Word to PDF Convert MS Excel to PDF Convert MS PowerPoint to PDF Convert .txt to PDF Save a webpage as PDF Save a copy of your emails as PDF Or create a PDF or image file from any other software or format Bullzip PDF Printer has it all!
Ever found yourself wondering if there is an easy way to add something onto a screen shot image without having to paste it into MS Paint or other image editing softwares? Or, you may want to take a screen shot of only a certain portion of your screen without having to go through the trouble of cropping.
If you are a MS Windows user, there is an incredibly easy way to doodle or highlight anything directly on to the Print Screen Image. It also allows you to take cropped screen shots.
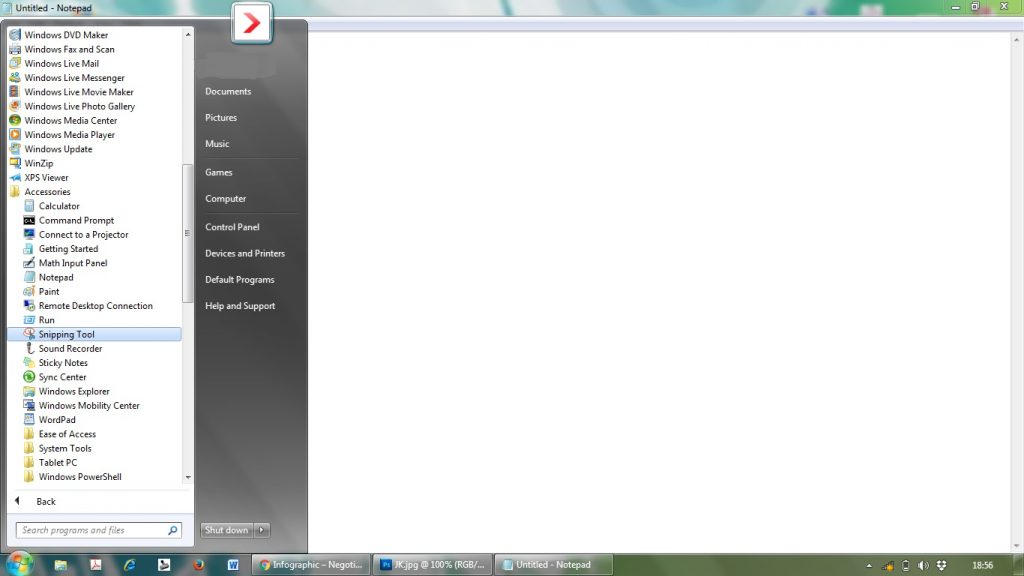
The “Snipping Tool” comes with MS Windows. You do not have to download or install anything. You can find it in your Accessories folder. (Snipping tool comes with Windows Vista, 7, 8, 10, Server 2008, and Server 2012. The only versions of Windows that do not include Snipping Tool are Windows 7 Starter and Windows 7 Home Basic.)
Got to Start Button > All Programs > Accessories > Snipping Tool
Free Snipping Tool for Windows
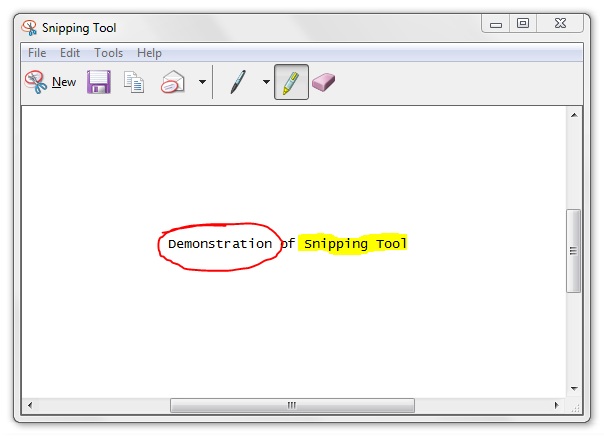
It gives you the choice to take Free-form, Rectangular, Window and Full-Screen screen shots.You may also doodle directly on the screen shot. You can change ink color and line thickness as well. There are 16 different colors to choose from. If you want to highlight anything on the screenshot, you may do so using the Highlighter feature.
Highlight or Write on Screen Shots Directly
And once you are done, you may email the screen shot directly from the snipping tool, or copy/paste it in your document or, save it on your computer in JPG, PNG, GIF or MHT format. How cool is that!!! One little tool to capture screen shots and edit them at the same time! No installation or downloading required!
I had no idea that a lot of people doesn’t know about this neat little tool that comes free with MS Windows. But when a couple of my clients shouted “Eureka!!!!!!” after I told them about this, I thought I should share it with my readers too.


 In today’s age and time, there are a lot of people who use fax messages (yes, still!).